Turning your Linux box into a Windows Compatible Server
This article will explain the how to use a Linux machine to provide you with the additional Network Attached storage that you require.
Do you need some additional space on your network where you can dump or backup files because you are running out of space on your main server. Perhaps you need some space for storing Network Accessible CD-ROM images. This article will explain the how to use a Linux machine to provide you with the additional Network Attached storage that you require.
Before starting this article, please see Building a Linux Server as you will need to have completed that tutorial before you can proceed with this one.
Creating share points on a Windows System is quite simple. You would create a folder and then Right Click it and choose Sharing. The defaults in Windows would allow the “Everyone” group to be able to read the contents of this shared folder.
Client computers would access the shared folder using UNC (Universal Network Connector) paths. e.g. servershare.
Permissions to the share are controlled at the machine hosting the Shared resource. This machine can be any Windows operating System from Windows 98 right up to Windows Server 2003. However Microsoft introduced restrictions into the Windows platform that would prevent more than 10 connections at any given time to a network share – unless of course your operating system is a Server platform.
Installing a server platform can be quite expensive, as you would need suitable hardware and then of course software and client access licences in order to be licenced correctly.
The cheaper solution is to use a free add-on to Linux called Samba. This is a Windows SMB (Server Message Block) compatible server application that can be installed onto Linux.
Samba comes in two parts, the Service and the Client. There are also some useful plugins for WebMin that allow administration of the Samba service.
Samba is capable of emulating a Windows Domain as well as being able to join a Domain and become a Backup controller or Member server, although this article will not cover this subject in detail. Visit www.samba.org
Now the Tutorial
I am going to assume that you have already got your Debian/Ubuntu Linux server up and running. If not build your Linux server following the tutorial on Building a Linux Server. You will also need to extend your linux platform by adding Webmin (see tutorial – Webmin – the most useful Linux tool that you will ever use), using Webmin will make sharing folders and complex tasks a little easier.
Logon to your Linux machine as a root priviledged user. You can elevate your user priviledges by using the su command.
At the command prompt, use the apt-get tool to retrieve and install the required Samba elements.
apt-get install samba samba-client
The apt-get package installer will prompt, stating that additional packages will also be installed. As Samba won’t work without these, continue by pressing Y.
Once the packages have been downloaded and installed, the apt-get package manager will start the configuration wizard to get Samba up and running quickly.
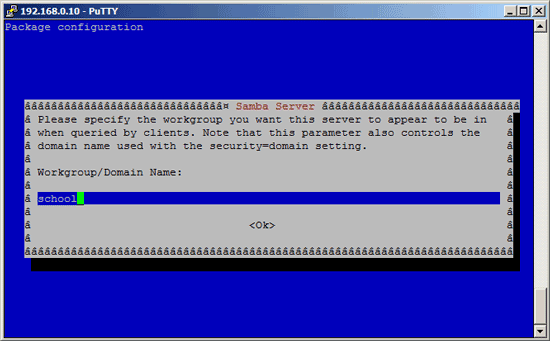
Enter a Workgroup or Domain name
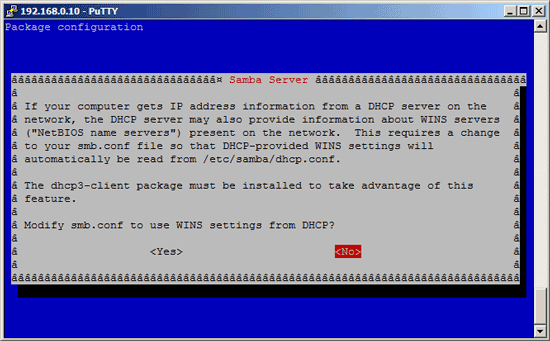
The Wizard will then prompt, asking how WINS should be configured. Most networks don’t use a WINS server these days, but it can help when resolving names on the local network. I choose No to this prompt.
The installation for Samba finishes and all current accounts on the Linux machine are then imported into the Samba server.
Now we shall configure Samba using the Webmin interface, on a network connected machine with a web-browser, connect to your linux machine on the webmin interface, e.g. https://server:100000/
Once logged into Webmin, use the left side menu to browse to Servers – Samba Windows File Sharing. This will display the default shares and services that have been created by the installation package.
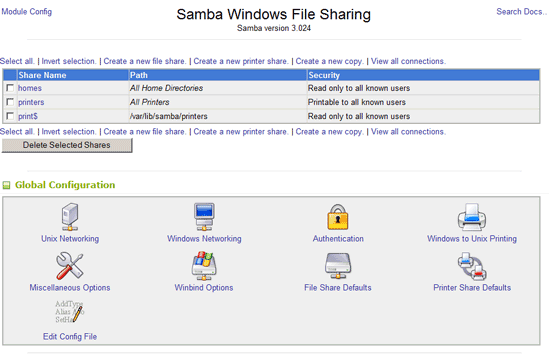
Select the Windows Networking module, to begin defining how Samba will talk to Windows machines.
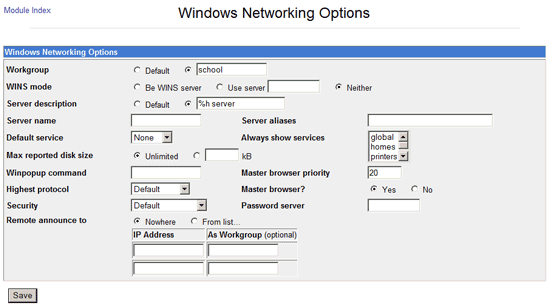
Configure the following options;
- Server Name – Same name as your Linux Host
- Highest Protocol – NT1
- Security – Share Level
Click Save
This tutorial will only go into basic file sharing and access, athough Samba can be configured to authenticate against a Windows 2000/2003 Active Directory, or an old Windows NT domain.
Samba will reload its configuration after approximately 1 minute, although you can force changes to take place immediately by restarting the Samba Services.
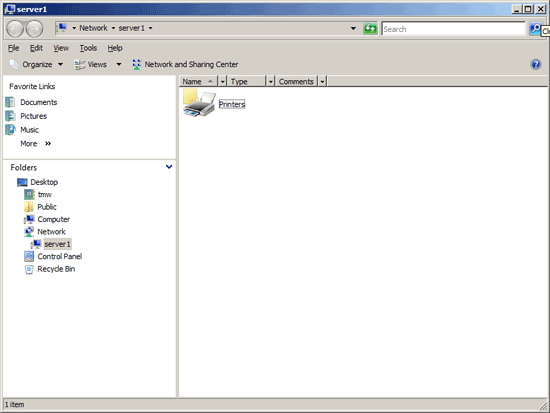
You can now test the connection to the Linux machine by testing from a Windows machine. At the Windows machine, click Start, then Run. Type in SERVERNAME and press Run/OK. Replace the SERVERNAME with the name that you set in the Samba Server Name. All being well, Windows will connect to the Linux machine and display default shares.
Creating a Public Folder
In the Webmin – Samba Windows File Sharing module, underneath the available shared folders, click the hyperlink to create a new File Share.
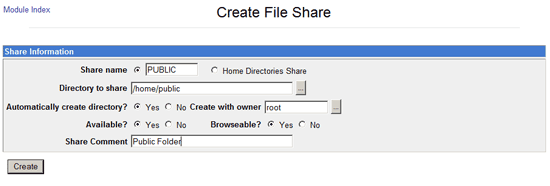
Enter the details for the new shared folder;
- Sharename – PUBLIC
- Directory to Share – /home/public
- Share Comment – Public Folder
Click the Create button to create the new shared folder.

Notice that the new share is marked as Read Only to all known users. Click on the share name to alter its properties.
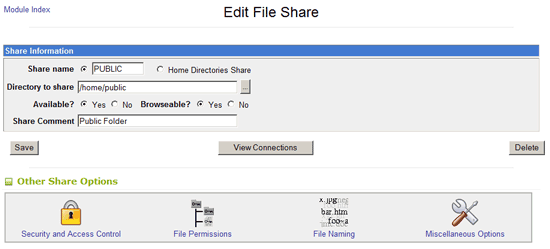
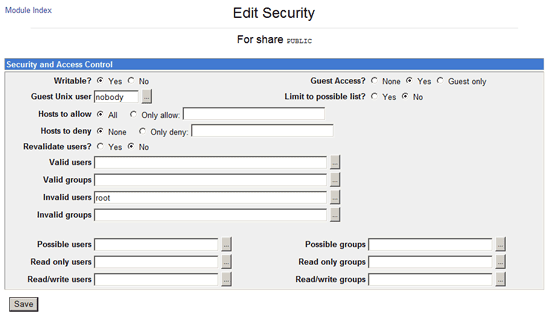
Click on the Security and Access Control icon. Set Writeable to Yes, and Guestaccess to Yes. Then save the changes.
Wait for the Changes to apply or restart the Samba Service.
On the Windows Machine, refresh the connection to SERVERNAME, the public folder will now be available. However the folder your Windows user will not be able to save files into this folder. This is because the Linux file permissions are in force, preventing any changes to the files and folders contained within the share.
On the Linux machine, browse to the home folder, using the command
cd /home
Now list the folder contents by using the ls -l command, this will display extended information about the folders, including permissions and owners.
server1:/home# ls -l
total 8
drwxr-xr-x 2 root       root       4096 2007-09-18 21:23 public
drwxr-xr-x 2 schooltech schooltech 4096 2007-09-18 19:09 schooltech
server1:/home#
The listing above shows that the root user has full control of the public folder, all other users have read and execute access. This is the reason why our Windows Guest has no access to the folder.
There are 2 possible permission changes that will give our Windows Guest access to the folders.
- Change the owner of the folder, so that nobody user is the owner
- Change the permissions of the folder, so that world has read and write access to the folder
As this is a public folder, changing the owner would be preferable.
1. Changing the owner
chown nobody /home/public
2. Changing the permissions
chmod 757 -R /home/public
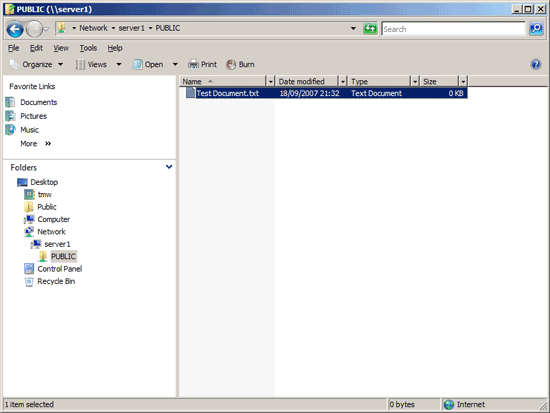
The changes will take effect immediately. Using the Windows client, create a new file in the shared folder to verify that read/write access is possible.
Extending Samba
This tutorial has just given a very brief introduction to using Samba and setting up a single shared folder. Obviously Samba has a whole lot more to offer than just simple file sharing, using and configuring Samba to a larger extent is beyond the scope of this tutorial.
A good Google search will often find relevant conversations or tutorials about using Samba to its full potential. For example as a Windows Server replacement.